CI/CD and Deployment Of NodeJs to Heroku Using Jenkins on Google Compute Engine


In this article, we will create a CI/CD pipeline that will deploy our nodejs app to Heroku using Jenkins on google compute engine.
What is CI/CD?
Continuous Integration(CI) and Continuous Delivery(CD) involve developers making changes to code frequently and these changes are tested before being deployed to the production environment. The tests and deployment are done automatically using CI/CD pipelines. This way changes made are deployed faster, safer, and reliably.
What is Jenkins?
Jenkins is an open-source automation server that enables developers to reliably build, test and deploy their software. Currently, it offers more than 1,000 plugins, so it integrates with almost all DevOps tools, from Docker to Puppet. With Jenkins, you can set up and customize your CI/CD pipeline according to your own needs.
In this article, you'll need:
- A Google Compute Engine Vm
- An Heroku account
- A GitHub account
- Jenkins
Google Compute Engine
Google compute engine is an Infrastructure as a Service (IaaS) that allows users to execute workloads on google physical hardware.
Google offers new customers $300 in free credits to spend on Google Cloud for 90 days. All customers get a general-purpose machine (f1-micro instance) per month for free, not charged against your credits. How to open a GCP free tier account
Launch a compute engine VM
Once you've created the gcp account, click on the sidebar, go to compute engine and click VM Instances. Click the plus + sign to create the vm instance and configure your vm as shown below:
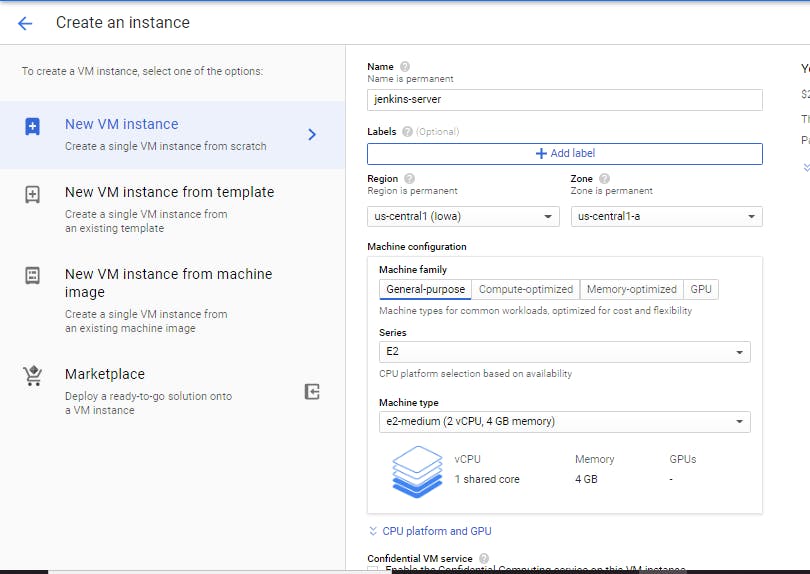
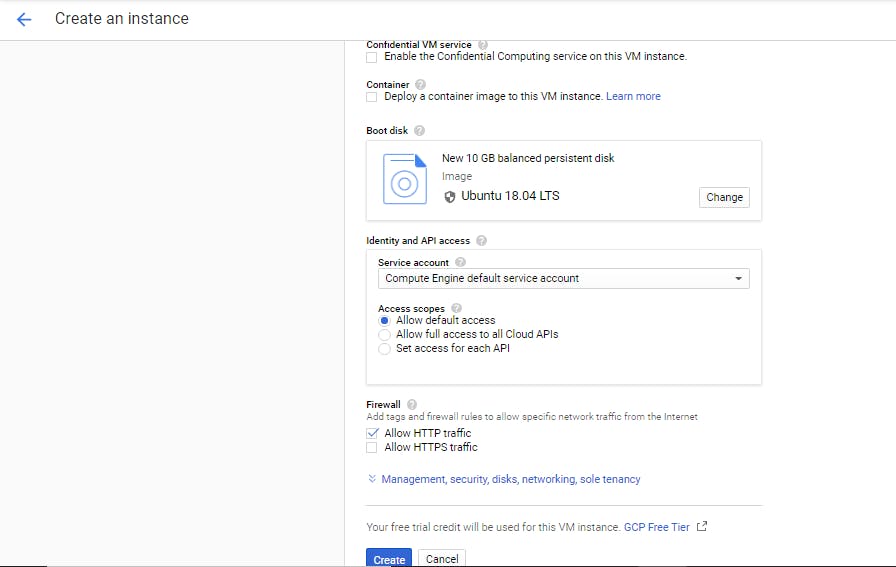
The default boot disk is "Debian GNU/Linux 10 (buster)", click change, under operating system select Ubuntu and under version select, Ubuntu 18.04 LTS, leave the remaining options as default and click select. Under firewall select allow http traffic, leave all other settings as default and click create. Wait for the instance to start up and you'll be given an internal and external-ip address and can connect using ssh.
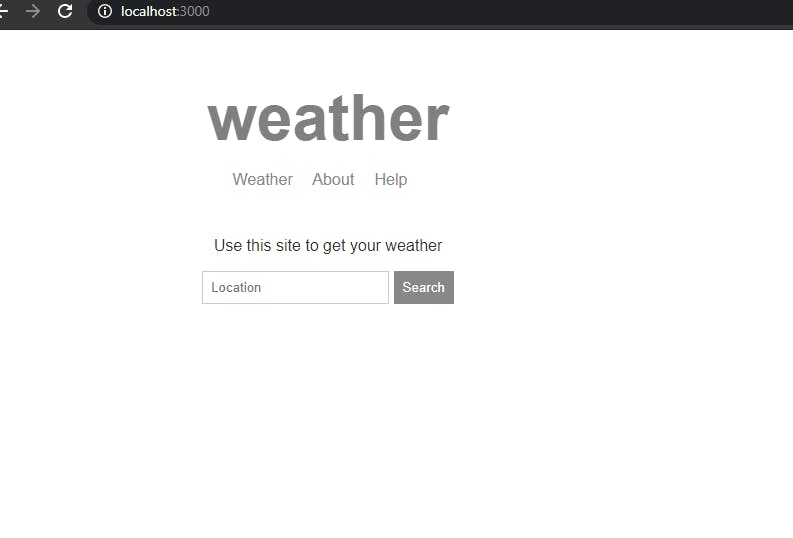
Running the app locally
Fork this repository to your repository https://github.com/ToluwalopeAyo/Jenkins-Weatherapp.git
Clone it to your local system git clone https://github.com/<username>/Jenkins-Weatherapp.git
Change into the directory, install dependencies and start the app
npm install
npm start
Go to your browser and enter localhost:3000
Installing and Setting Up Jenkins
In GCP, go to your VM instances page, you'll see your instance up and running. Click on ssh and connect to your instance Before we can use Jenkins, we need some dependencies and we need to install Jenkins to the server.
sudo apt install openjdk-11-jdk openjdk-11-jre -y
Add the jenkins repository key to the server
wget -q -O - https://pkg.jenkins.io/debian-stable/jenkins.io.key | sudo apt-key add -
Add the debian package repository to the servers sources lists
sudo nano /etc/apt/sources.list
deb https://pkg.jenkins.io/debian-stable binary/
Update your local package index, then finally install Jenkins
sudo apt update
sudo apt install jenkins -y
Set Jenkins to start
sudo systemctl start jenkins
Check Jenkins status
sudo systemctl status jenkins

Set the Jenkins service to be available at boot
sudo systemctl enable jenkins
Let us now configure Jenkins
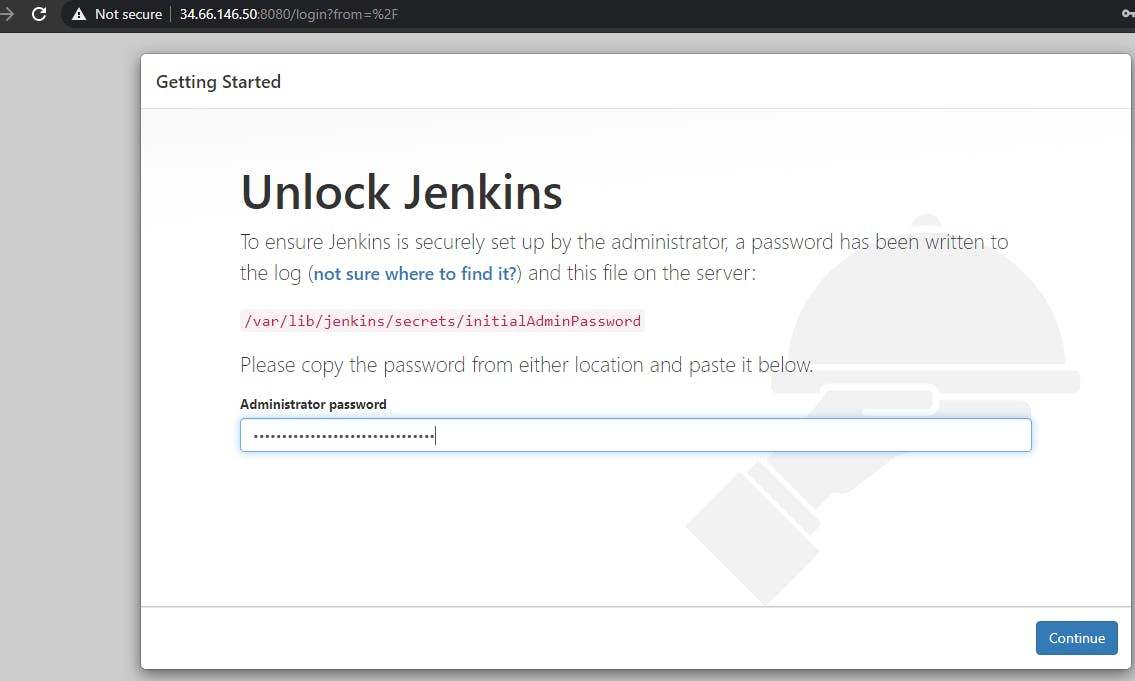
Open your browser and go to external-ip:8080, Jenkins listens on port 8080. You will see the Unlock Jenkins page and the location of the admin password. Copy the password and use it to login.
Then click on install suggested plugins After installation, we'll create our first admin user. Fill in your username, password, full name and email address and click Save and Continue. Skip the Jenkins URL configuration and we can start using Jenkins.
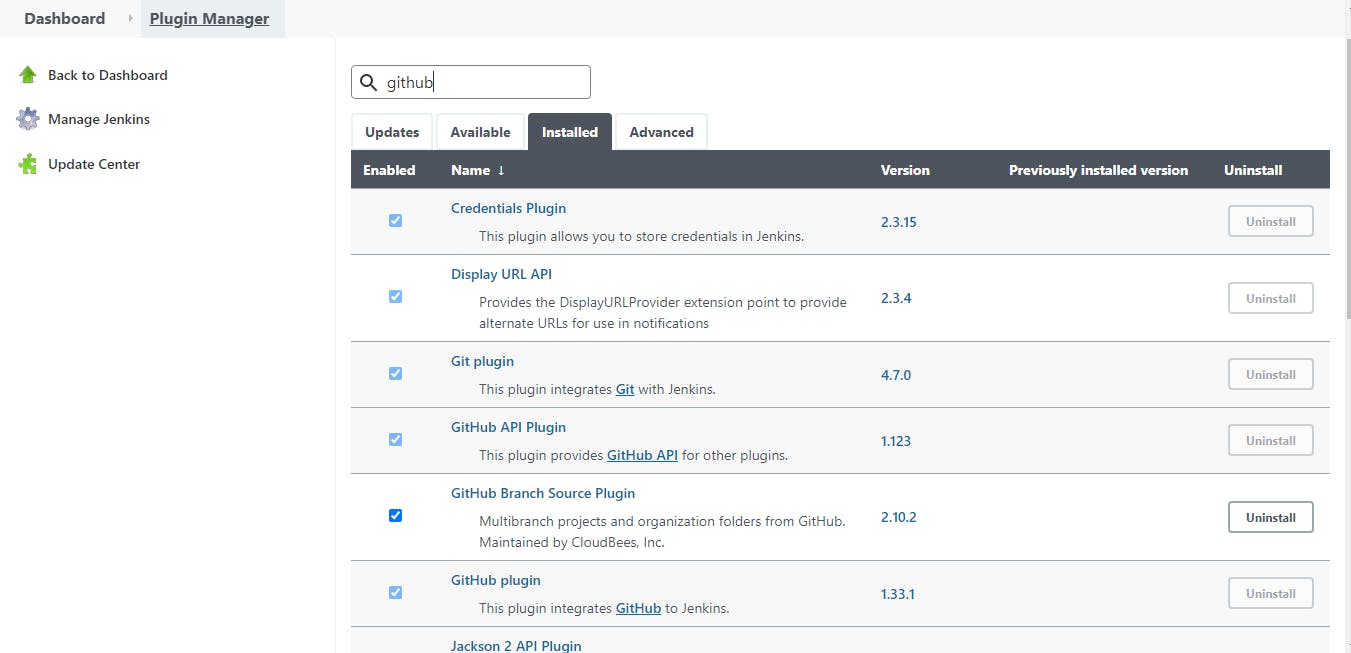
Adding GitHub plugins to Jenkins
Go to manage Jenkins and click manage plugins Search for Github and Check under installed, you'll see that the github plugin is installed already
Creating a Pipeline
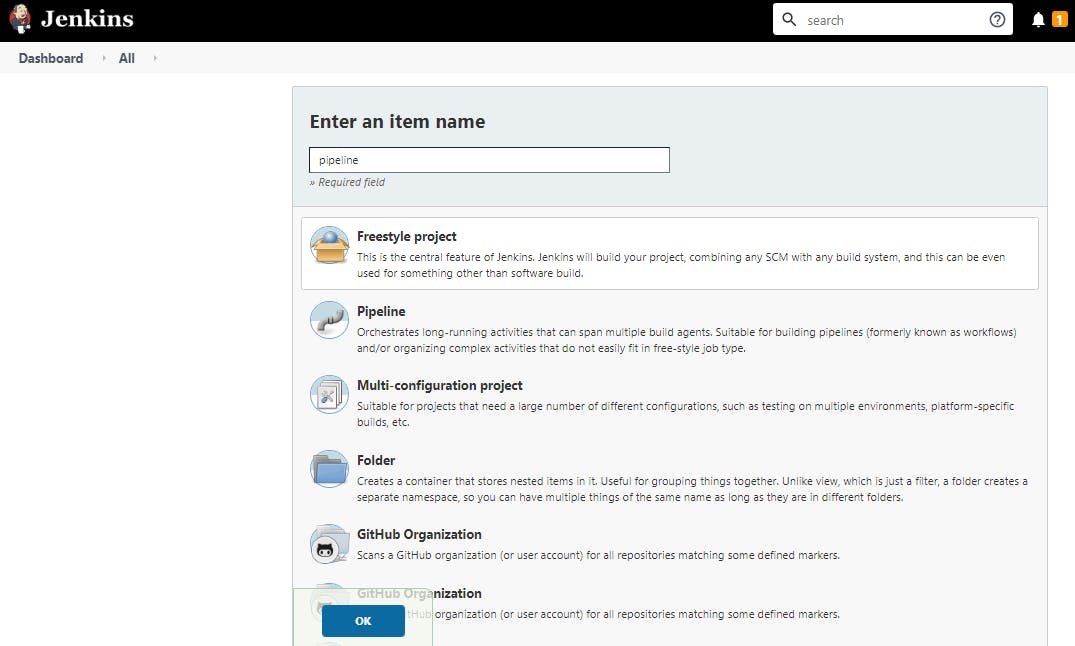
On the Jenkins Dashboard, Click on New Item
Give it a name of your choice, and click on Freestyle project then click OK.
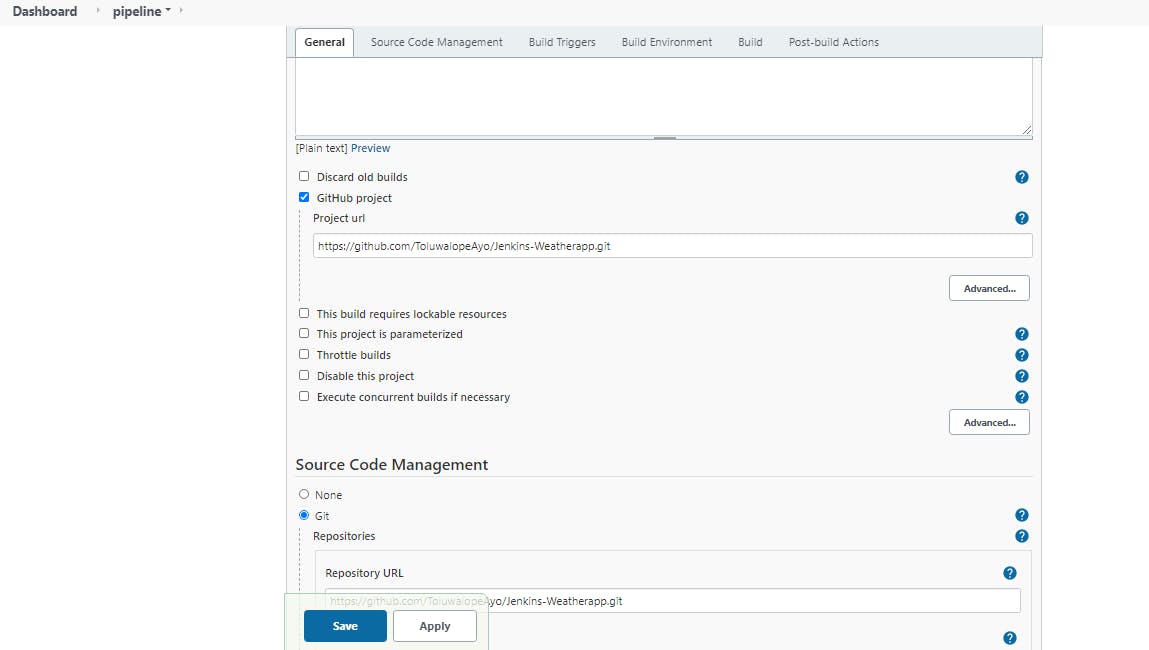
In the General section, tick the Github Project box and enter the link to your github repository.
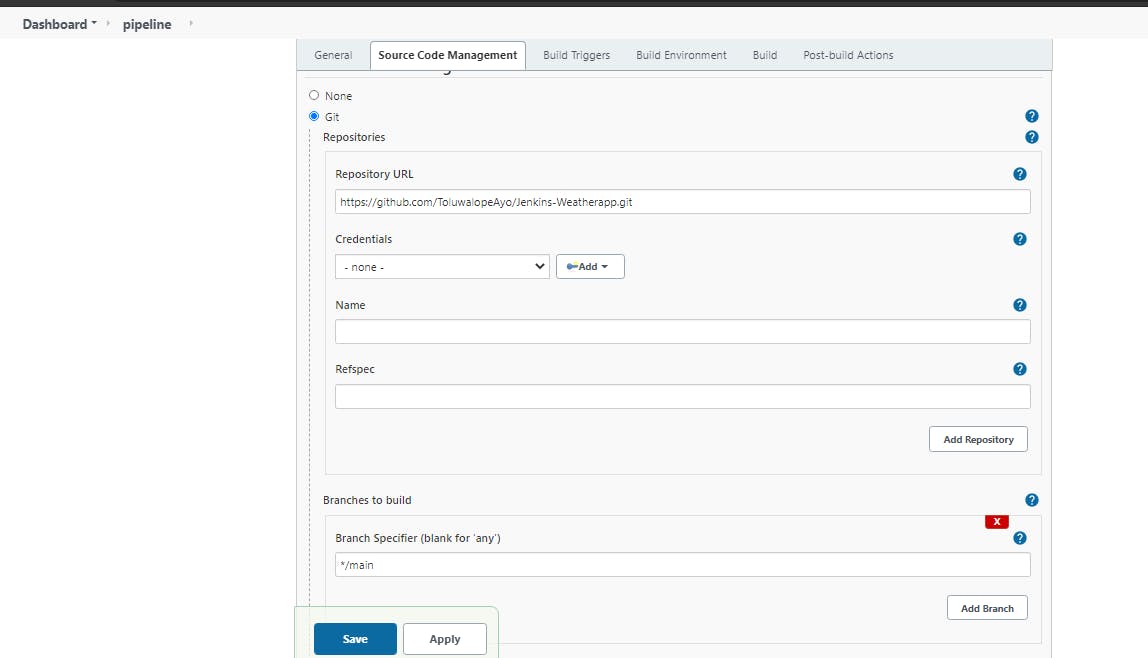
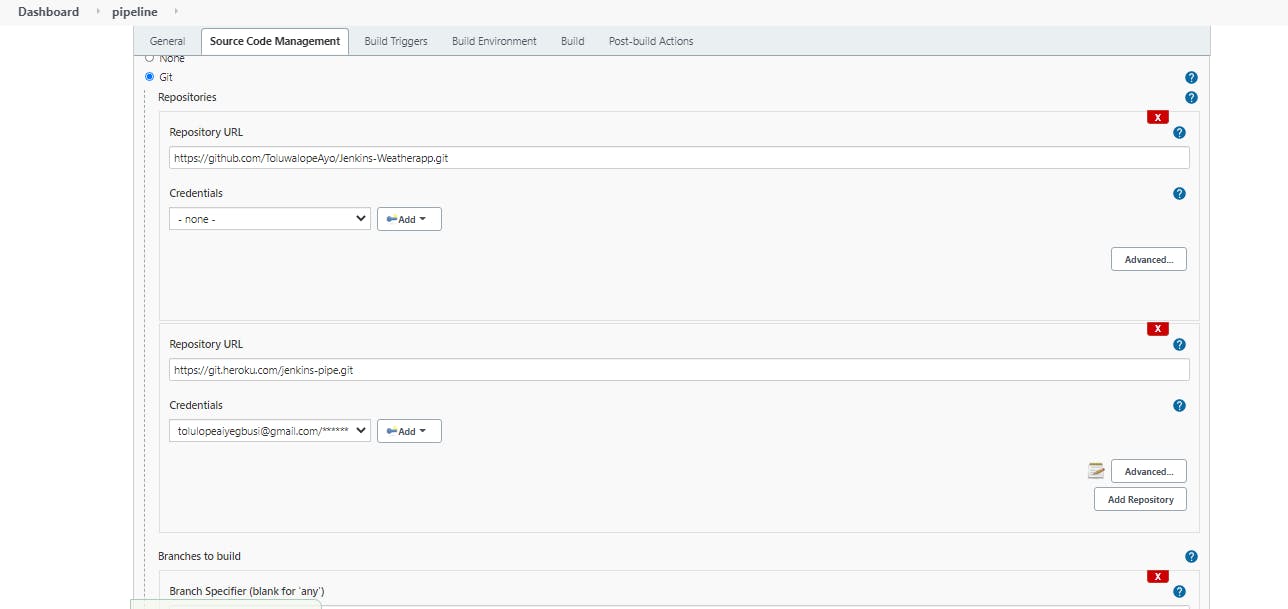
Under Source Code Management, click on Git and enter the same link to the github repo.
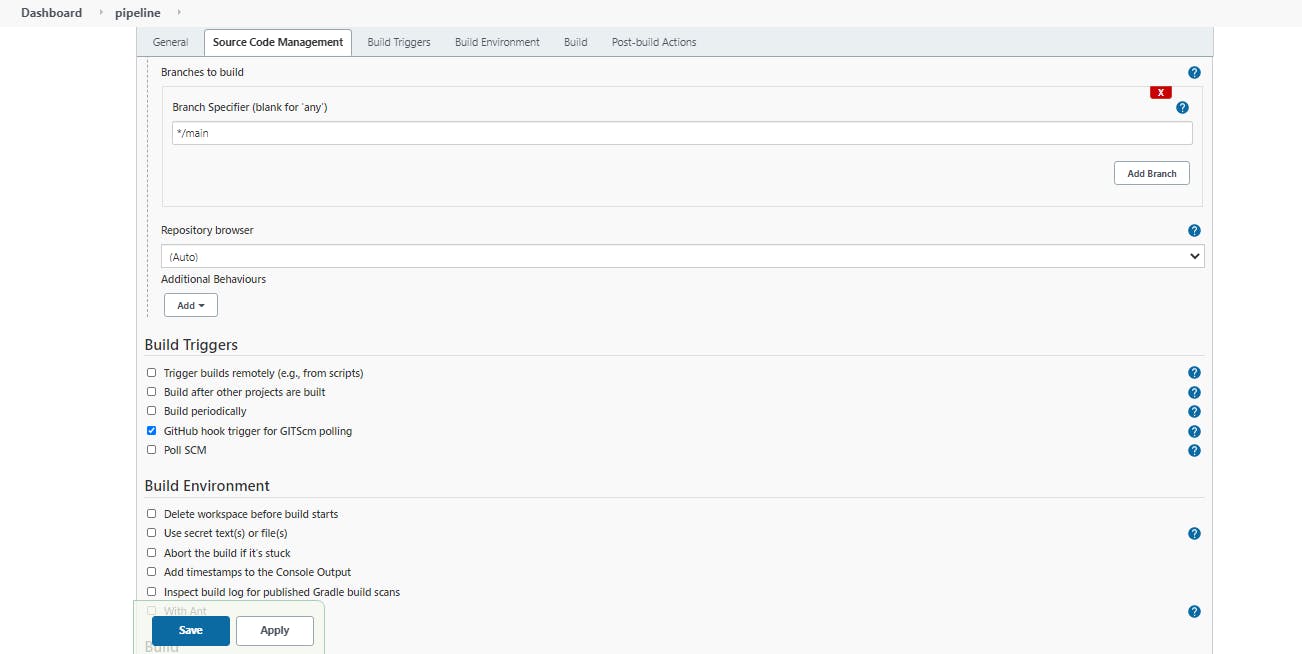
Under Branches To Build, enter main, our code is in the main branch of the repository.
Let us confirm that the pipeline can build successfully from the github repository.
Make sure your configuration is just like the one below and Click Save.
Click on Build now and the build should be successful. Click on the build number and Go to the console output, you would see something like this

Building to Heroku
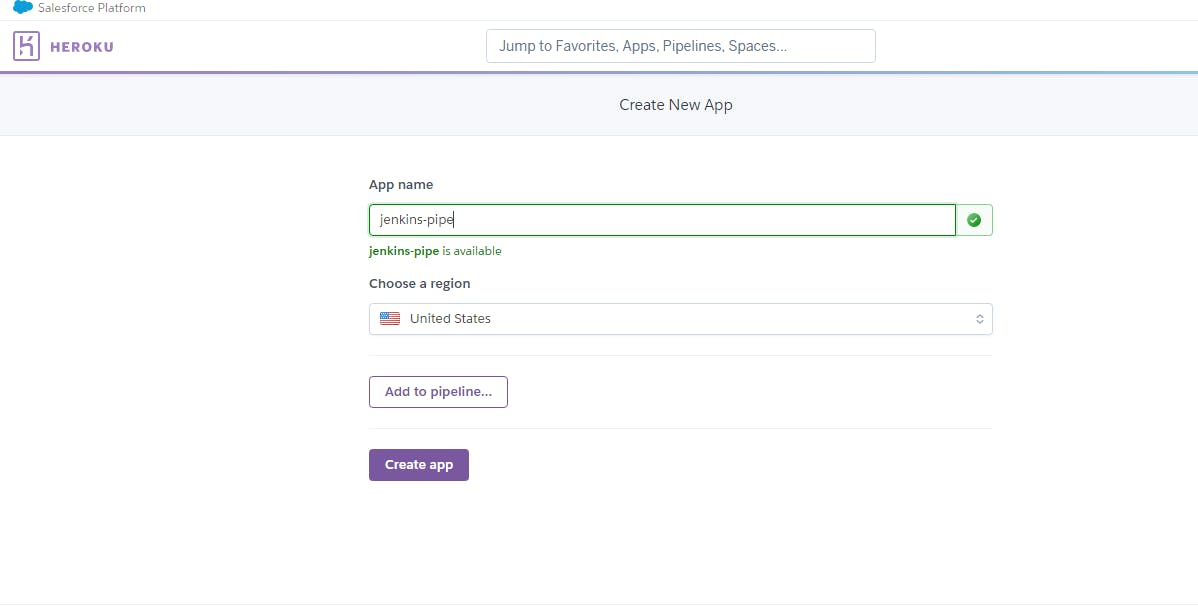
- Create a Heroku account if you don't already have one
- Click on create new app, give it a name of your choice and choose your preferred region.
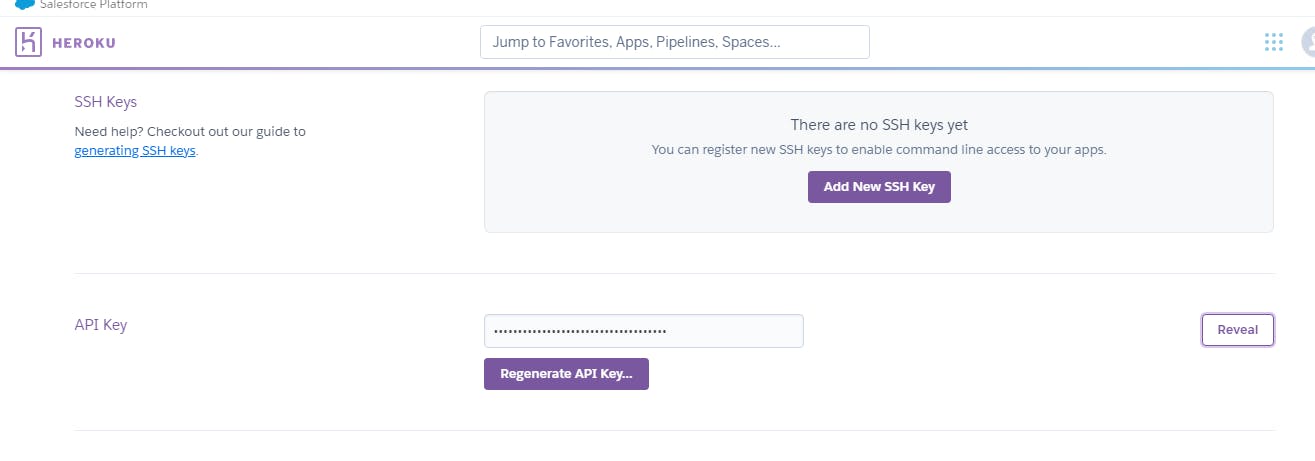
Go to your account settings, scroll down, copy your API key and keep it somewhere, you would be needing it later.
The app we just created, go to the app settings and copy the heroku git URL git.heroku.com/.git
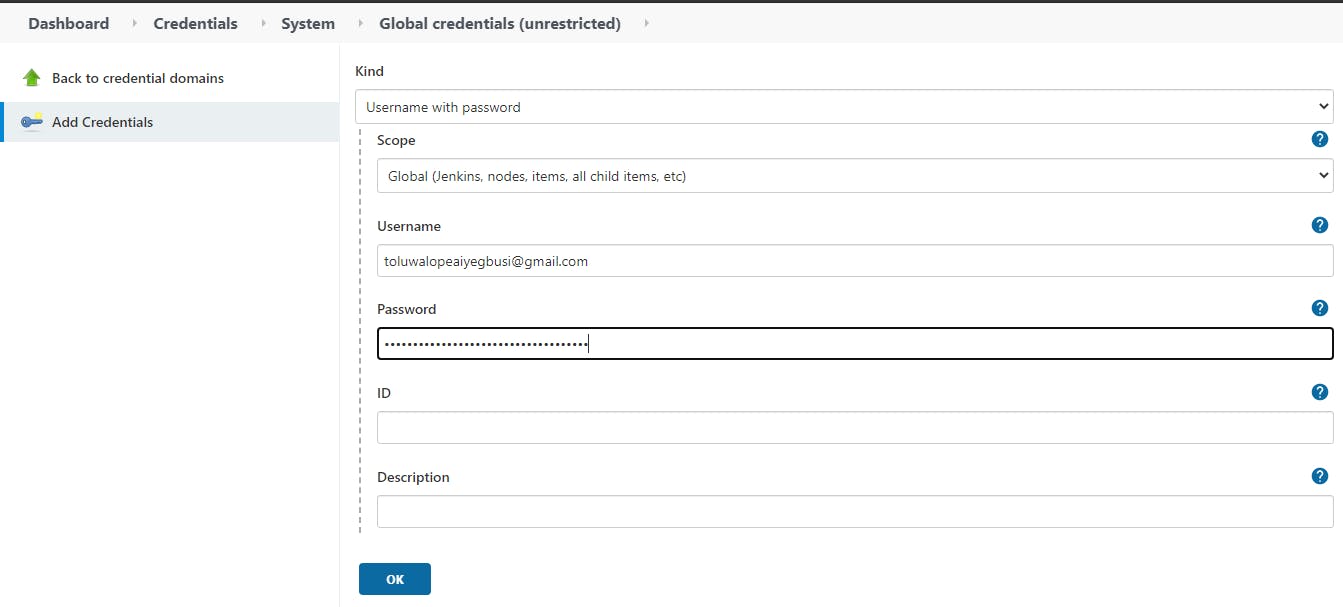
In Jenkins, click manage jenkins > Manage credentials > Jenkins > Global credentials (unrestricted)
On the side menu click add credentials
Enter your heroku username or email address and the API key you copied and click ok.
On the dashboard, click on the pipeline that we created earlier and click configure
Under Source Code Management, click Add Repository and enter the Heroku git URL we copied earlier
You would get an error, looking like this
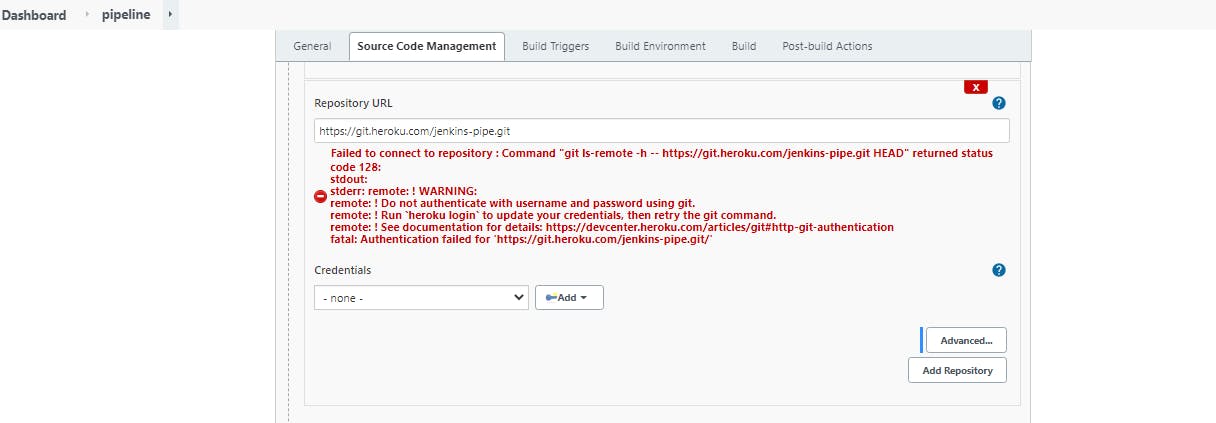
Under credentials, you would see the one you created earlier, select it and the error should clear out.
Click Advanced and give the repo a name, we would be needing it later.
Click Save. This is because we have to save the repo name first.
Click on Configure again
Under Build Triggers, select GitHub hook trigger for GITScm polling
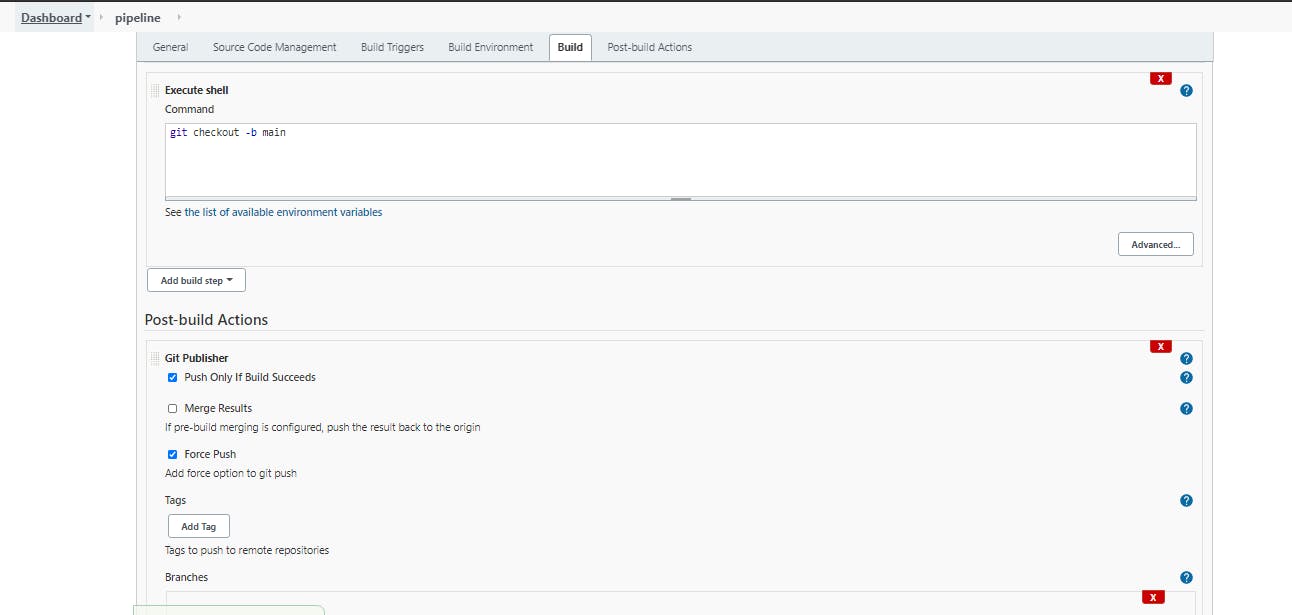
Under the Build section, Click on Add build step button and then click on Execute shell. Enter the following code into the shell
git checkout -b main
Under the Post Build Actions, select Git Publisher
Select ```Push Only If Build Succeeds````
Select Force Push
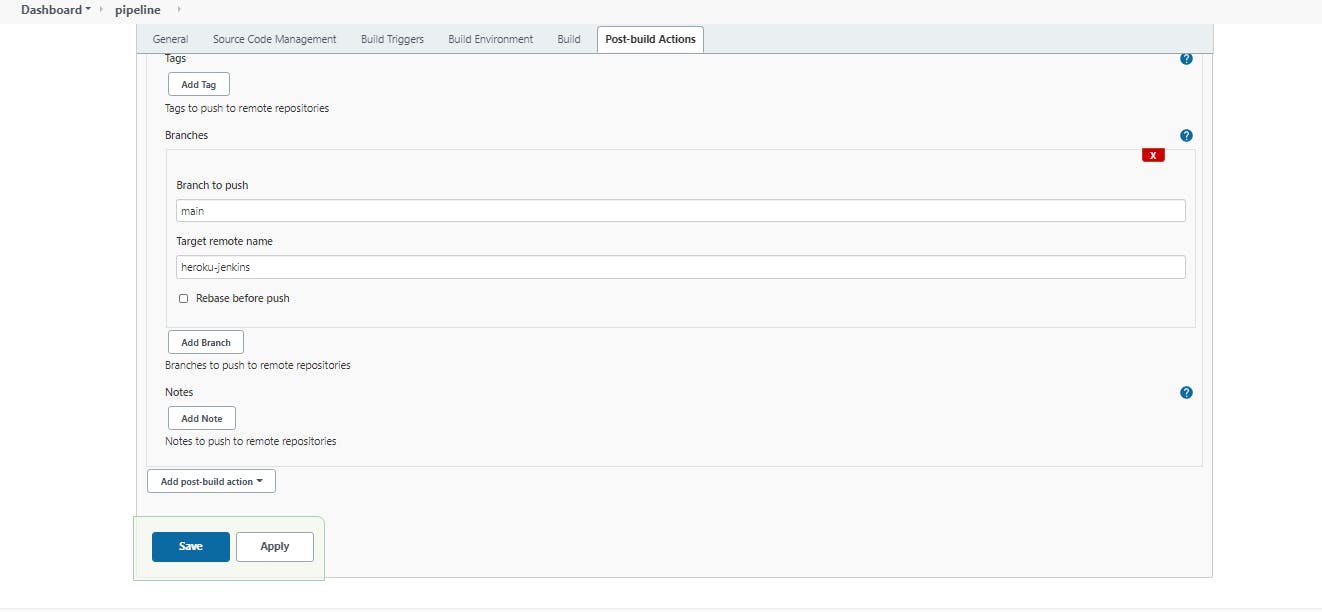
Click on Add Branch
In the Branches to Push box, enter main this is because heroku, uses the main branch
In the Target remote name, enter the name we gave to our heroku repo earlier
So far your configuration should look like this and click on save

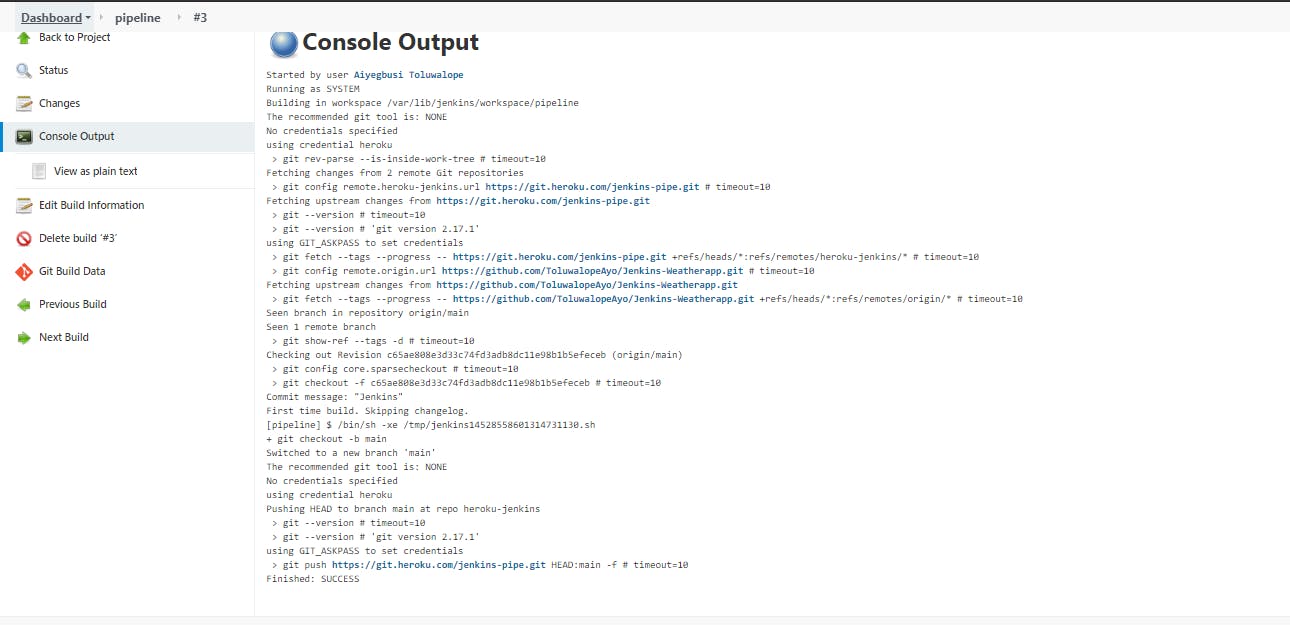
Click on Build Now and the build should be successful. When you check the console output, you would see something like this.
Go to heroku and check the overview of the app, you would see that the build succeeded.
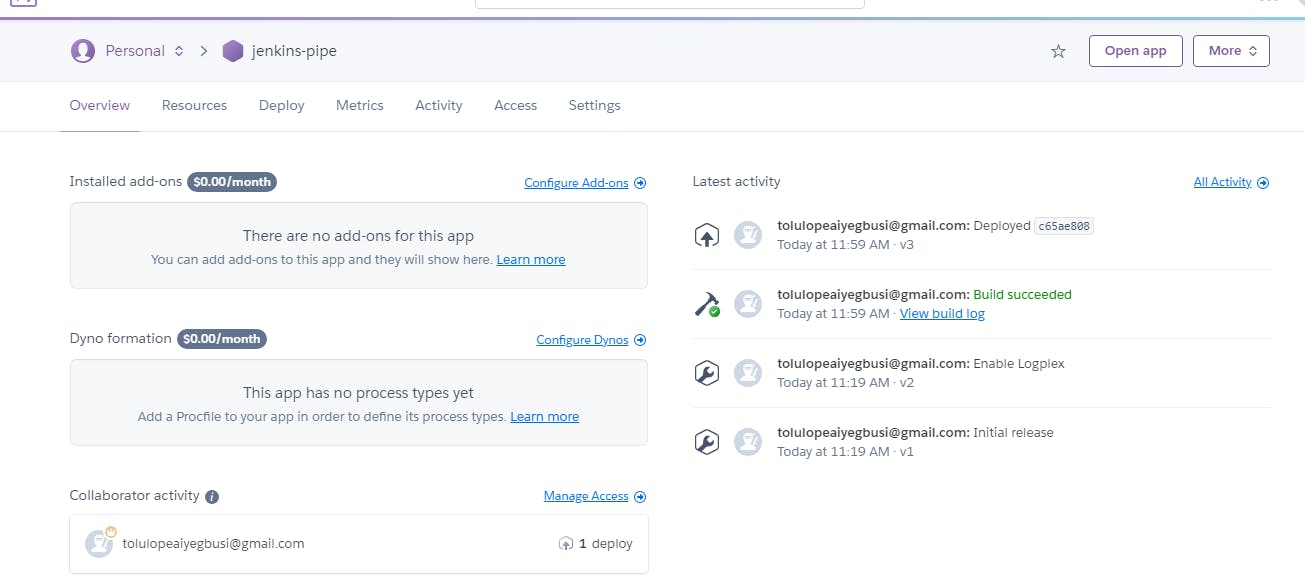
Click on Open app and you would see the Weather App.
Automating Our Pipeline
When changes are pushed to the github repository, you'll have to manually go back to deploy the changes on Jenkins which can be sometimes stressful. We're going to set up Jenkins and Github in a way that once changes are pushed to the repository, Jenkins would automatically deploy to Heroku. We would be using Github Webhooks.
Add Github webhook to push events to Jenkins
Webhooks allow you to build or set up integrations, which subscribe to certain events on GitHub.com. When one of those events is triggered, it sends a HTTP POST payload to the webhook's configured URL. Webhooks can be used to update an external issue tracker, trigger CI builds, update a backup mirror, or even deploy to your production server.
Go to your github repository settings and click Webhooks
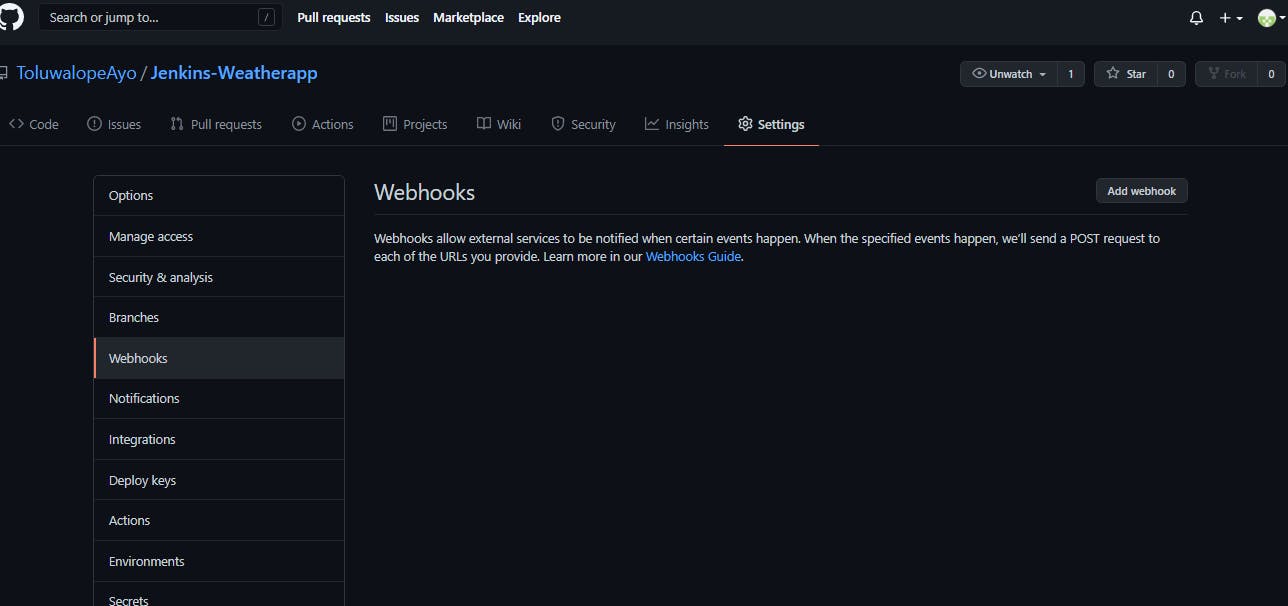
Click on add webhooks
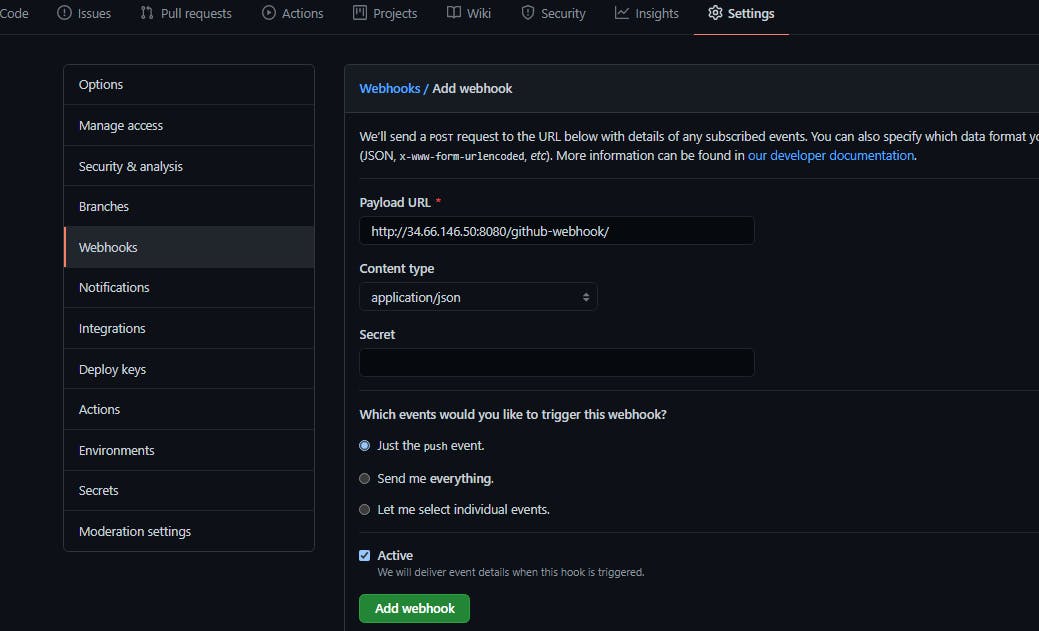
Enter the external-ip address of your jenkins VM like this http://<external-ip>:8080/github-webhook/
Go back to jenkins and configure the pipeline, clear out the git checkout -b main in the execution shell and save it.
You can now push changes to the repository and Jenkins will automatically deploy to heroku.
I wrote this article because I came across several issues when configuring my pipeline and most articles I saw were either outdated or too cumbersome. I really hope this saves you the stress I went through and you find this very useful. Thanks for reading.