Deploy A Simple Web-app With Nginx On Google Compute Engine


In this article, we would be deploying a simple web-page with an nginx web-server on a google compute engine with a random port, forward the port to http port 80 and install an SSL certificate to load over HTTPS. Before we move on, make sure you have a GCP compute engine instance running.
Web Servers
A web server is a computer that runs websites. A web server delivers web pages to clients that requested them. A web server communicates with the web browser using HTTP. Examples of web servers are Apache, Nginx, Microsoft IIS, Apache Tomcat, and so on.
Nginx
Nginx, developed by Igor Sysoev in 2002, is a web server that can also be used as a reverse proxy, load balancer, mail proxy, and HTTP cache. Reverse Proxy vs Load balancer. One of nginx strongest feature is its ability to efficiently serve static contents.
Google Compute Engine
Google compute engine is an Infrastructure as a Service (IaaS) that allows users to execute workloads on google physical hardware.
Google offers new customers $300 in free credits to spend on Google Cloud for 90 days. All customers get a general-purpose machine (f1-micro instance) per month for free, not charged against your credits. How to open a gcp free tier account
Launch a compute engine vm
After creating the account, click on the sidebar and click on compute engine. Click the plus sign to create a new instance. Let your instance be configured as below:
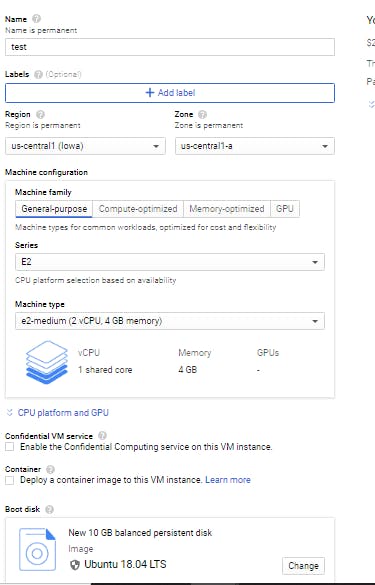 The default boot disk is "Debian GNU/Linux 10 (buster)", click change, under operating system select Ubuntu and under version select, Ubuntu 18.04 LTS, leave the remaining options as default and click select. Under firewall select allow http traffic, leave all other settings as default and click create. Wait for the instance to start up and you'll be given an internal and external-ip address and can connect using ssh. Click the ssh button and connect to the instance.
Installing Nginx
To install nginx, first, update the dependencies and install nginx
sudo apt-get update
sudo apt-get install nginx -y
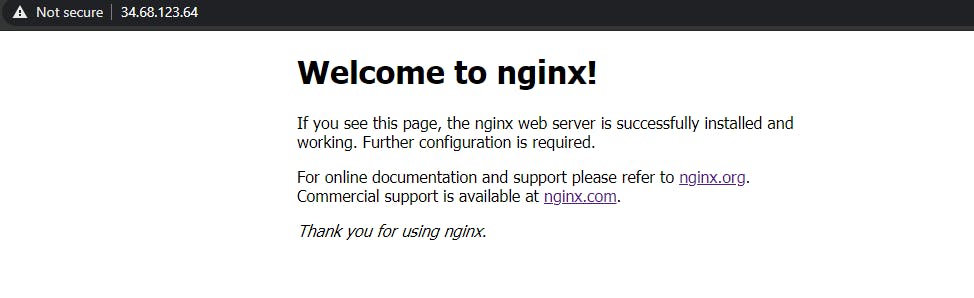
To confirm you have correctly installed nginx, copy the external IP address of the instance and enter it in your browser, you should get the default 'Welcome to nginx page'
Configuring Nginx
The configuration file, nginx.conf is located in /etc/nginx. Understanding the nginx config file.
We would be configuring our nginx.conf file from scratch so you can either move the default file somewhere else to keep as a backup sudo mv /etc/nginx/nginx.conf /etc/nginx/ng.cf or delete the file totally sudo rm /etc/nginx/nginx.conf
Let's get the files we'll use
git clone https://github.com/ToluwalopeAyo/webapp
Use nano to open a new config file
sudo nano /etc/nginx/nginx.conf
You must add sudo to the command because only the root user is allowed to edit the file. Then enter the following:
Make sure you're in the directory where you cloned the repo and type pwd to give full path to the directory
http {

        server{

             listen 8080;

             root /<full path to directory/;
       }
}
events{}
ctrl + o and enter to save, ctrl + x to exit
sudo systemctl reload nginx
Go to your browser and enter :8080, oops, the site can't be reached. This is because in gcp you have to set a firewall rule to allow connection to port 8080.
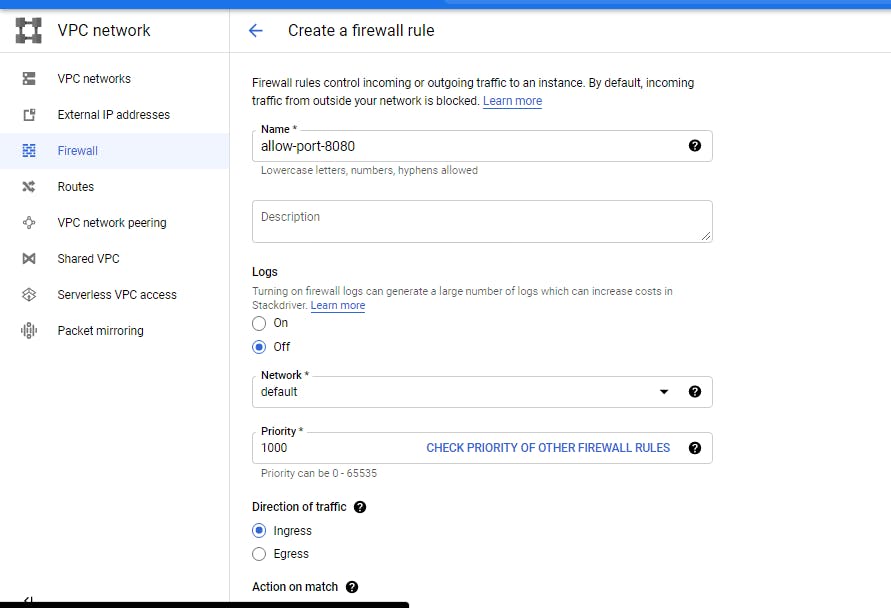
Setting firewall rule
Click on the sidebar > VPC Networks > Firewall There are some default firewall rules there already and we'll add to it. Click the plus sign to create a firewall rule. Configure the firewall as below:
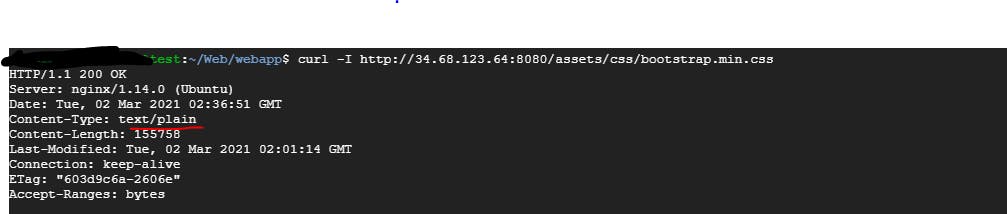
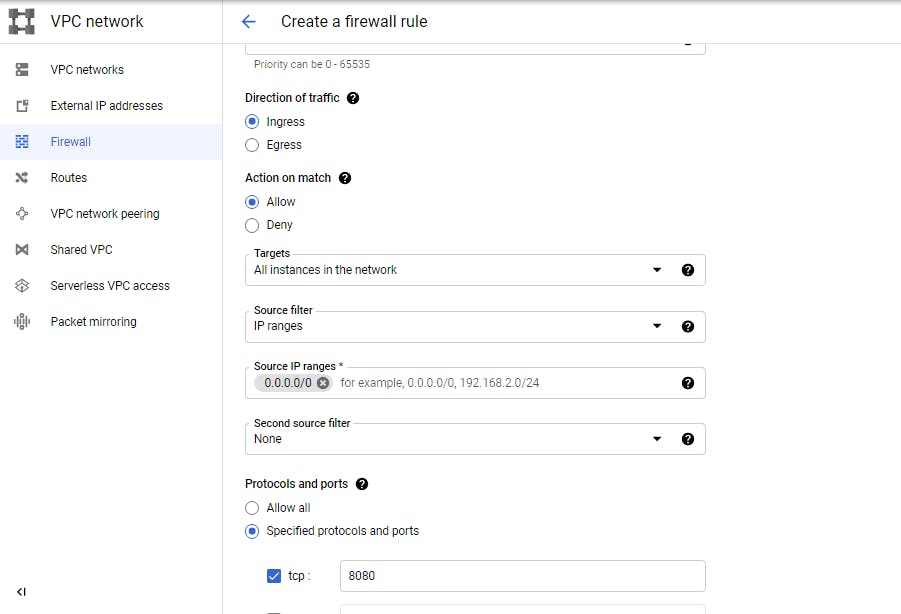 and click create. Go back and reload your browser. The page loads and it's just some boring disarranged HTML page. This is because it reads every other file as plain text except the index.html file.
Go to the terminal and enter
and click create. Go back and reload your browser. The page loads and it's just some boring disarranged HTML page. This is because it reads every other file as plain text except the index.html file.
Go to the terminal and enter
curl -I http://<external-ip>:8080/assets/bootsrap.min.css
and you get a similar output
Go back to the config file and edit it
sudo nano /etc/nginx/nginx.conf
http {

        include /etc/nginx/mime.types;

        server{

             listen 8080;

             root /<full path to directory/;
       }
}
events { }
reload the nginx server sudo systemctl reload nginx
Go to your browser and do a hard reload on the page ctrl + shift + R Then our page is up nicely.
###Forwarding port 8080 to HTTP port 80
Edit your config file to look like this
sudo nano /etc/nginx/nginx.conf
http {

        include /etc/nginx/mime.types;

        server{

             listen 8080;

             root /<full path to directory/;
       }
        server {
             listen 80;
             location / {
                       proxy_pass http://localhost:8080/;
             }
       }
}
events { }
ctrl + o and enter to save, ctrl + x to exit
reload the nginx server sudo systemctl reload nginx
Go to your browser and this time enter http://:80 and it's working perfectly fine. Apart from the config file where we asked nginx to listen on port 80, remember that when we were creating the compute engine instance we ticked the "Allow HTTP traffic" box, there's a default firewall rule to allow http traffic already.
Configuring TLS Certificate
Go to noip.com and create a custom domain that will be linked to the external-ip address of the compute engine instance We'll be using letsencrypt to get our TLS certificate. Letsencrypt is a nonprofit certificate authority providing TLS certificates to 240+ million websites.
Install Letsencrypt
sudo apt-get install letsencrypt -y
Stop the nginx server because letsencrypt will need to listen to port 80 to get the certificates
sudo systemctl stop nginx
Ask letsencrypt for certificates
sudo certbot certonly --standalone
Answer the necessary questions and get the location of the certificates copied somewhere
Edit the config file
http {

        include /etc/nginx/mime.types;

        server{

             listen 8080;

             root /<full path to directory/;
       }
        server {
             listen 80;
             listen 443 ssl;

             ssl_certificate <file path>/<file.pem>;
             ssl_certificate_key <file path>/<file.pm>;
             location / {
                       proxy_pass http://localhost:8080/;
             }
       }
}
events { }
ctrl + o and enter to save, ctrl + x to exit
start the nginx server
sudo systemctl start nginx
Don't go to your domain name yet, go to the compute engine instance and edit it to allow HTTPS traffic. Click on the name of the vm and click the pencil icon that says edit, scroll down and tick the box that says "Allow HTTPS traffic" and save changes. You can now go to your custom domain and you'll see the padlock sign that says your web is now encrypted and secure.
Thanks for reading.
Video Reference:
2 hours crash course on nginx